
基于canvas实现的绚丽圆圈效果完整实例
本文实例讲述了基于canvas实现的绚丽圆圈效果。分享给大家供大家参考,具体如下:
运行效果截图如下:
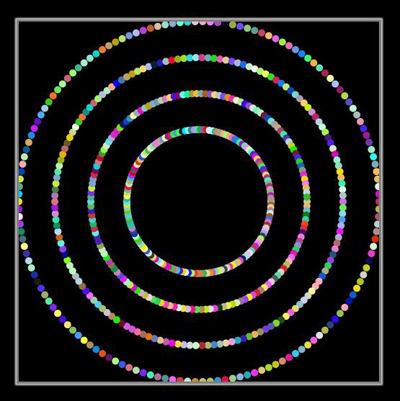
具体代码如下:
<!DOCTYPE html>
<html>
 <head>
  <title>demo</title>
  <style type="text/css">
   body {
    margin:0; background:black;
   }
   #canvas {
    border:3px solid gray; box-shadow:0px 0px 2px 2px #D5D5D5; margin-left:100px; margin-top:50px;
   }
   #power {
    position:fixed; bottom:50px; right:50px;
   }
   #power a {
    color:green; text-decoration:none; display:inline-block; padding:20px; border:2px solid orange; box-shadow:0px 0px 2px 2px blue;
    font-size:30px;
   }
  </style>
 </head>
 <body>
  <canvas id="canvas" width="500px" height="500px"></canvas>
  <script type="text/javascript">
   var canvas = document.getElementById("canvas");
   var ctx = canvas.getContext("2d");
   var colorList = "abcdefABCDEF0123456789".split("");
   var colorListLength = colorList.length;
   var arcList = [];
   function createArc(attr) {
    ctx.beginPath();
    ctx.fillStyle = attr.color || "black";
    ctx.arc(attr.x, attr.y, attr.r, 0, Math.PI*2);
    ctx.closePath();
    ctx.fill();
   }
   function color() {
    var color = "#";
    for(var i=0; i<6; i++) {
     color += colorList[Math.round(Math.random()*colorListLength)];
    }
    return color;
   }
   function Arc() {
    this.count = 0;
    this.r = 5;
    this.x = Math.round(Math.random()*500);
    this.add = Math.round(Math.random()*5);
    this.limit = Math.round(Math.random()*100)
    this.mode = Math.round(Math.random());
    var _self = this;
    _self.run = function() {
     if(_self.r >= _self.limit) {
      _self.run = null;
      return;
     }
     _self.x += _self.add*(_self.mode == 1 ? 1 : -1);
     createArc({x: _self.x, y:Math.round(Math.random()*400), r: _self.r, color: color()});
     _self.r += 5;
     return _self;
    };
    return this;
   }
   var init_count = 150;
   var init_time = 0;
   var init = function() {
    init_time++;
    arcList.length = 0;
    for(var i=0; i<init_count; i++) {
     arcList.push(new Arc());
    }
   };
   var reInit = function() {
    var angle = Math.PI*2/init_count;
    for(var i=0; i<init_count; i++) {
     var _angle = i*angle;
     createArc({x: 250 + 250*Math.cos(_angle), y: 250 + 250*Math.sin(_angle), r: 5, color:color()});
     createArc({x: 250 + 200*Math.cos(_angle), y: 250 + 200*Math.sin(_angle), r: 5, color:color()});
     createArc({x: 250 + 150*Math.cos(_angle), y: 250 + 150*Math.sin(_angle), r: 5, color:color()});
     createArc({x: 250 + 100*Math.cos(_angle), y: 250 + 100*Math.sin(_angle), r: 5, color:color()});
    }
   };
   init();
   var globalInterval = setInterval(function() {
    ctx.clearRect(0, 0, 500, 500);
    var count = 0;
    for(var i=0; i<init_count; i++) {
     var arc = arcList[i];
     arc.run ? arc.run() : count++;
    }
    if(count == init_count) {
     if(init_time >= 2) {
      reInit();
      return;
     }
     init();
    }
   }, 100);
  </script>
 </body>
</html>
更多关于js特效相关内容感兴趣的读者可查看本站专题:《jQuery动画与特效用法总结》及《jQuery常见经典特效汇总》
希望本文所述对大家JavaScript程序设计有所帮助。
JavaScript小技巧整理篇(非常全)
能够为大家提供这些简短而实用的JavaScript技巧来提高大家编程能力,这对于我来说是件很开心的事。每天仅花上不到2分钟的时间中,你将可以读遍JavaSc
基于JavaScript如何制作遮罩层对话框
1.遮罩层其实就是一个覆盖全界面的半透明的DIV,并处理zIndex使他浮于其他元素之上,是用户不能点击下边的元素,或者说点击没有反应。2.在遮罩层上
基于JavaScript实现全屏透明遮罩div层锁屏效果
废话不多说了,直接给大家写js代码了,代码如下所示:!DOCTYPEhtmlPUBLIC"-//W3C//DTDXHTML1.0Transitional//EN""http://www.w3.org/TR/xhtml1/DTD/xhtml1-transitional.dtd"htmlxmlns="http: